
9 Easy Movements for Hip Bursitis
With balance and the ability to move, sit, walk, jump, and run all coming down to the hip, any type of pain in this area can quickly prove to be a huge hindrance.
It’s not something you just slap a bandaid on and are able to move on with your day, as the injury could sit deep beneath the skin, within the bones and joints - like with hip bursitis.
It’s estimated that 15% of women and 8.5% of men struggle with this in the USA, yet this condition still seems a mystery to many.
Let’s take a look at what hip bursitis is, some common causes, and (most importantly) we’ll walk you through some easy movements you can do at home to help if you are suffering from it.
What Is Hip Bursitis?
Hip bursitis, in its simplest explanation, is inflammation of the bursa (fluid-filled sacs that support a joint) in the hip.
Bursitis is most commonly experienced in the elbow, knee, hip, and ankle areas. It’s usually caused by strain or overuse of a joint which impacts the soft tissues that cushion it, ie. the bursa.
Common Causes of Hip Bursitis Pain
The most common activities that can cause or aggravate this include long periods of standing, walking, or running, particularly if the amount of this you are doing increases suddenly. Other actions that could also have an effect include hiking, climbing stairs, and gardening.
Aside from the usual reasonings of overuse, there are some possible other common causes too:
Trauma: Direct trauma to the hip (like a fall) can bring on irritation and inflammation of the bursa.
Poor Posture: Improper posture can bring on a whole load of issues. Sitting incorrectly can put pressure on the area and lead to inflammation over time.
Obesity: Excess weight can put additional stress on the hip joint which increases the risk of inflammation and pain.
Inflammatory Conditions: Autoimmune diseases or conditions like gout can increase the risk of developing hip bursitis.
Hip Bursitis Symptoms
The pain of hip bursitis can vary depending on the severity of each person’s situation, but generally, this condition presents itself in the following symptoms:
Pain: This is the most common and usually can be felt on the outside of the hip and may radiate down to the thigh. This could worsen when doing physical activity or lying on the affected side.
Swelling: With the bursa being inflamed, you could see visible swelling around the hip area. This can contribute to tightness or stiffness and may be tender to the touch.
Limited range of motion: Due to the pain and inflammation, you may see a decreased range of motion from the hip joint. This could impact bending, squatting, walking, or even crossing your legs.
Managing Hip Bursitis Pain
There are several ways to combat and alleviate hip bursitis pain. Treatment options include:
Pain relief medication, from general over-the-counter medicines like ibuprofen, naproxen, or acetaminophen to more specialized medications like antibiotics and non-steroidal anti-inflammatory drugs (NSAIDs), can help reduce pain and inflammation. You should consult advice from a medical professional on whether these are right for you.
Using a walking aid (like a cane or crutches) can reduce the pressure of your body weight on your hips, encouraging the bursitis to heal naturally.
Physical therapy exercises and controlled stretching help to increase movement, reduce pain, and strengthen your hip. Scroll down for more information on this.
Red light therapy is a non-invasive kind of therapy where light technology is used to stimulate blood flow in the target area, reducing pain and inflammation.
Steroid injections can be used to combat swelling and are usually administered straight into the bursa. In patients experiencing hip bursitis pain, corticosteroid is usually the steroid of choice.
In patients with recurring bursitis, the inflamed bursa is sometimes surgically drained or removed altogether, though these treatment options are not common.
Hip Bursitis Recovery
With the right treatment, people suffering from hip bursitis can expect to recover after between 6-12 weeks.
Of course, resting and creating a realistic treatment plan (in consultation with a medical professional) will help to speed up recovery, but the specific time frame is different for everyone.
Where Does Trochanteric Bursitis Come in?
The phrase “hip bursitis” actually covers two more specific kinds of bursitis that can occur in the hip area:
- Iliopsoas bursitis causes pain in the front part of the hip - more in the groin area
- Trochanteric bursitis causes pain in the outer area of the hip (and is the more common kind of bursitis found in the hip)
9 Easy Hip Exercises and Stretches
As part of your treatment plan, there are several easy, at-home exercises and stretches you can do to support your body’s natural recovery and complement any other medications or treatments being given.
As with any exercise, this is guidance only and you should listen to your body and not overwork yourself during any recovery period.

1. Glute Bridge
- Lie down on your back with your knees bent and your feet flat on the floor, shoulder-width apart. Your arms should be relaxed by your sides, lying flat on the floor.
- Engage your glutes and abdominal muscles and slowly lift your hips upwards (keeping your upper body, arms, and feet on the floor).
- Keep your back flat, creating a straight line of your torso from shoulders to hips.
- Once your hips are as high as possible, hold the position for a few seconds before lowering back down to the floor in a slow and controlled way, still focussing on your glutes and abs.
You should aim to complete 3x or 4x sets of up to 25 reps.
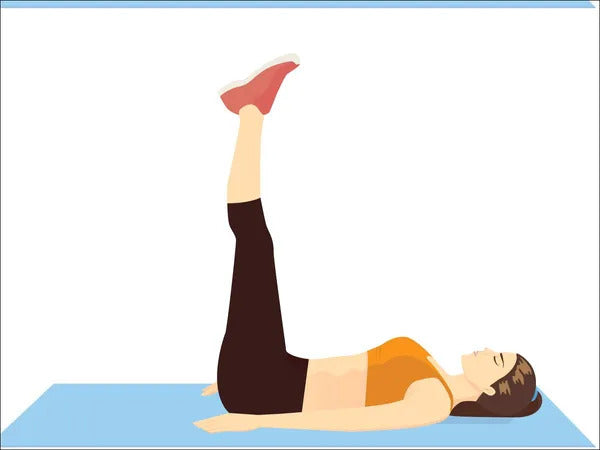
2. Leg Raises Or Leg Lifts
- Lie flat with your back flush with the floor and your legs outstretched, feet together. Your hands can either be placed under your coccyx (the bottom of your back) to provide support for your back or placed underneath your neck for added support there.
- Inhale and lift both legs slowly, with feet outstretched and keeping legs as straight as possible. Your core should be engaged throughout.
- Pause when your legs reach as high as they can - taking them no further than fully vertical, i.e. at a right angle to your body.
- With your next exhale, slowly lower your legs (still engaging your core), pausing when they are just above the floor. That’s one rep complete.
You should aim to do 10 reps at a time.

3. Clamshell
- Lie on your side with your legs on top of each other and knees slightly bent. Prop your head up with your hand on the arm closest to the floor, with a supporting upper arm on the floor and elbow bent at a right angle to hold your head.
- Keeping your feet together, lift your top leg (the one furthest from the floor) upwards and outwards - leading this action with the knee and hinging it at the feet. Focus on leading this movement from your hips.
- Lower your knee back to the original position, parallel with the other leg.
- Switch sides and repeat the above.
You should aim to complete 1x-3x sets of up to 15 repetitions on each side.
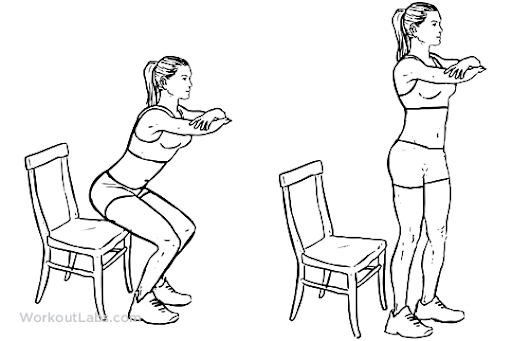
4. Chair Squat
- Stand tall in front of a chair with your back to it, standing a near/far enough distance that you could sit straight down comfortably. Keep your feet shoulder-width apart.
- Engage your core as you slowly bend your knees and tilt your hips, as if about to sit on the chair. Your arms can either hang by your sides or lift to form a right angle at your shoulders.
- As your bottom touches the chair, immediately begin to slowly stand back up, tilting your hips back and squeezing your glutes. That’s one rep complete.
You should aim for 3x sets of up to 10 repetitions.

5. Fire Hydrant
- Get into all fours on the floor with your hands and arms sitting directly underneath your shoulders and your knees sitting directly under your hips, holding your body weight off the floor at four points.
- Engage your core and focus your eyes on a steady point to keep your balance.
- Slightly lift one of your knees off the floor, keeping it in a right angle shape and rotating it at the hip to lift sideways as far as your flexibility will allow, no higher than about 45 degrees.
- Once you’ve reached the furthest rotational point, immediately begin to lower the leg.
- Switch sides and repeat on the other leg.
You should aim to do 1x-2x sets of up to 10 repetitions.
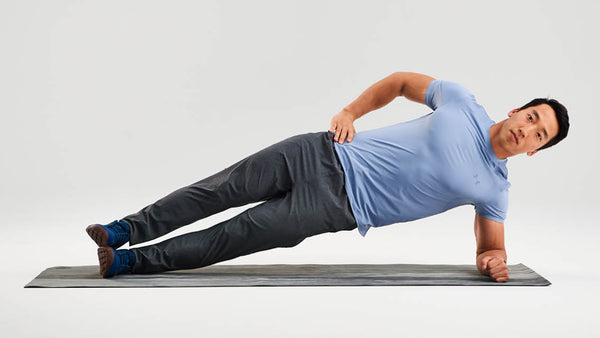
6. Side Plank
- Lie on your side with your legs on top of each other, stretched out straight.
- Place the arm nearest to the ground out on the floor at a right angle to help stabilize your body.
- Pushing through your feet and the arm on the floor, lift your hips up sideways until your body is making one straight diagonal line. Engage your core and glutes for balance.
- Hold this for a few seconds before slowly lowering yourself back down. That’s one rep complete.
You should aim to complete 2x-3x sets of up to 15 reps.
7. Hip Rotator Stretch
- Lie on your back with your knees bent and your feet flat on the floor.
- Lift one foot and place the ankle on the thigh of the opposite leg with the knee facing outwards.
- Using your hand, gently push down on the knee with the palm of your hand. You should feel a stretch in the hip on the side of the elevated leg.
- Hold this position for up to 30 seconds.
- Switch sides and repeat on the other leg.

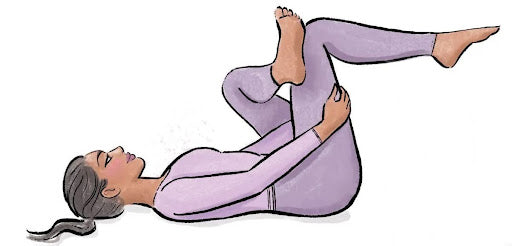
8. Butterfly Stretch
- Sit down on the floor, as if about to cross your legs.
- Place your feet out in front of you, jointed together with knees bent and close to your torso.
- Open your knees out, hinging them at the hips and feet to create a diamond shape on the floor. Your knees don’t have to touch the floor, but should be relaxed and not held up with any tension.
- For added stretch, you might lean forward slightly while keeping your back straight - but do this carefully while in recovery.
You should aim to hold this for 20-30 seconds.
9. Open and Close the Gate
Opening the gate:
- Stand up straight with both feet shoulder-width apart, engaging your core for balance.
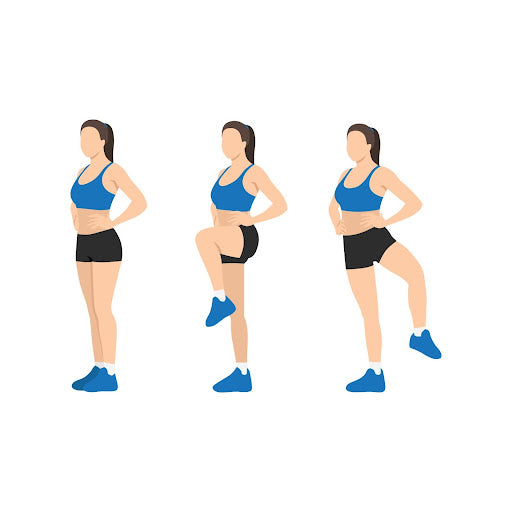
- Slowly lift one foot straight up, bending the knee. As the leg reaches maximum bend height, rotate the leg outwards (hinging at the hip) and slowly lower the leg, placing the foot back on the floor in a turned-out position.
- Switch sides and repeat on the other leg.
Closing the gate:
- Stand up straight with both feet shoulder-width apart in a turned-out position, engaging your core for balance.
- Slowly lift one foot straight up, bending the knee. As the leg reaches maximum bend height, rotate the leg inwards (hinging at the hip) until your knee is facing forward and slowly lower the leg, placing the foot back on the floor.
- Switch sides and repeat on the other leg.
You should try to complete 10x reps of each kind on each side.
What Movements Should I Avoid With Hip Bursitis?
Since hip bursitis stems from excessive use and strain of the hip joint, all exercise in the recovery period should be slow and steady.
For more articles on hip discomfort, movement and red light therapy, read: