6 Shoulder Stretches To Relieve Tightness
Even if you haven’t experienced trauma on the body, an injury, or any form of infection, tightness in the shoulders can still be expected. In fact, shoulder pain affects 18-26% of adults at any point in time, making it one of the most common regional pain syndromes.
When tightness within the shoulder starts to creep in, the nagging discomfort will impact and impede your daily life. Whether it’s making picking up your grandchild harder or keeping you awake at night, the effects will ripple through your day-to-day activities - impacting your overall well-being.
It doesn’t have to be all doom and gloom though, as relief is possible. Introducing some light shoulder stretches into your routine can help soothe your overworked muscles. Let’s look at the top 6 stretches to relieve tension and maintain the productivity of your shoulders.
What Causes Tight Shoulders?
Tight shoulders can be extremely uncomfortable, with the severity of pain differing between people and circumstances.
Here are the most common causes of tight shoulders:
Injuries: When surgery isn’t an option to heal a previous injury or accident, and you haven’t used alternative treatments, the body’s natural healing could result in residual tightness. Muscle imbalances can cause this, which could be more prominent for those who have sprained, strained, or dislocated their shoulder.
Lack of regular exercise: Living a sedentary lifestyle without partaking in regular exercise can weaken muscles in the shoulder and contribute to tightness. On the other hand, overuse, repetitive movements, and carrying heavy objects could leave you with shoulder pain too.
Stress: Anxiety and stress can manifest physically into tension and tightness in the shoulders and neck.
Poor posture: If you’re sitting for prolonged periods, slouching or hunching over a desk every day, your posture could strain your body. This is due to a misalignment, with other muscles working overtime to support your weight. Over time, this can lead to muscle fatigue and tightness.
Inflammation: If you have an inflammatory condition, like tendonitis or bursitis, this can leave your shoulders feeling tight, swollen, and even warm.
Targeted Areas Of The Shoulder
The shoulder is much more intricate than many think, as it comprises several key muscle groups, each playing a unique role in the overall functionality of the shoulder and arms.
One of the most critical is the rotator cuff. This group of four muscles and their tendons are responsible for stabilizing the shoulder joint. These include the supraspinatus, infraspinatus, teres minor, and subscapularis. Often, the rotator cuff is one of the most affected areas of the shoulder because it brunts the daily wear and tear.
The deltoids are the muscles that give your shoulder a rounded appearance. It’s the ball-and-socket joint that connects your arm to the rest of your body. These further enable movement and mobility, allowing your arm to move in various directions.
The shoulder girdle is also made up of the pectoralis major, pectoralis minor, trapezius, and serratus anterior.
The muscle that is most extensive across the upper body region is the trapezius. This is a flat and superficial muscle that goes from the cervical to the thoracic region on the back of the neck and trunk. It’s divided into three parts: descending, ascending, and middle. When this vital muscle is damaged or feeling tight, you may be unable to shrug your shoulders or even raise your arm.
6 Shoulder Stretching Techniques
Shoulder Raises [Easiest stretch]

This is one of the easiest but most rewarding stretches, as it can unlock the ability to do other stretches as your mobility increases. This is often the first step for slowly easing the tension.
It predominantly focuses on the trapezius muscle, which is located at either side of the neck and controls the movement of the shoulder blades, upper back, and neck.
It’s a simple but golden one! Here are the steps to take:
- Sit or stand with your arms hanging by your side. Your back should be straight, chin up, and look straight ahead.
- Slowly lift your shoulders upwards toward your eyes.
- Hold the stretch for a few seconds before lowering your shoulders back down.
To increase the intensity of this stretch, you could roll your shoulders back and forth and even tilt your head toward each shoulder while keeping them still.
Standing Wall Stretch [Another easy stretch]
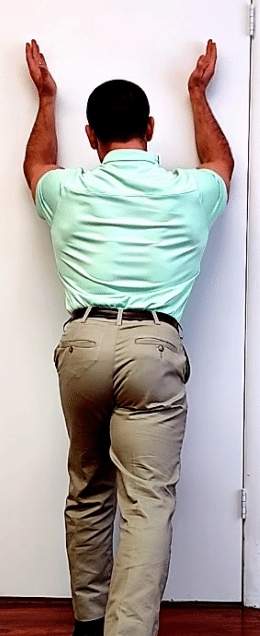
This stretch simply requires you to lean against a wall or something that can support your body, and it targets the shoulders, chest, and upper back.
More specifically, your front shoulder (anterior deltoid) will be the star of the show in this stretch.
- Stand adjacent to the wall and place both hands on it, forming a 90-degree angle to your body.
- Walk your feet out until your arms are straight.
- Hinge forward at the hips until you feel the stretch, all while keeping your shoulder blades set back.
Make sure not to push against the wall or put your arms too high, as you might be straining to reach certain distances.
The lower you hinge, the more you’ll feel the stretch. Your reach will depend on flexibility, so place your arms and bow to the level that feels most comfortable to you. Bending only slightly is more commonplace for those with tight shoulders.
Lateral Raises [Most misused stretch]

Lateral raises are a very common exercise and stretch but are often done incorrectly - especially by those coming back from an injury or issues in the shoulders.
To keep this as an effective stretch rather than a challenging exercise, use your body weight rather than dumbbells.
Some people make the mistake of doing this stretch with thumbs down. This can increase the compression of the rotator cuff muscles. The best way to achieve the full benefits of this stretch is by keeping your palms facing inward and your arms parallel to the floor.
Here are the steps:
Stand shoulder-width apart, with your palms facing inwards and arms out to your side but slightly in front of your body. Your arms shouldn’t be extended directly out to the side. You should keep a slight bend in the elbow.
- Engage your core and squeeze your glutes to create a strong base.
- Slowly raise your arms. Stop when your arms are parallel to the floor.
- Your arms should be slightly in front of you.
- Pause in this position before lowering your arms again.
The stretch is small, but you’ll immediately recognize the mobility in the shoulders; specifically the lateral deltoids.
To make it easier, bend your elbows more.
Arm Circles [Most popular stretch]

You’ve likely done the infamous arm circle stretch since being in school. The popularity of this stretch is for good reason, as it encourages your shoulder to move through a full range of motion, which can help with restrictions and discomfort.
Gradually, this stretch increases blood flow to the shoulder. This is beneficial for reducing stiffness and acting as a warm-up so you can move on to other stretches and exercises when you feel ready.
Arm or shoulder circles focus on the deltoids, rotator cuff, and upper back muscles. This stretch is unique as it activates and engages these in a dynamic way. While it may look simple, it can be an excellent stretch for your upper body.
- Stand upright with good posture. Your arm should start by dangling to the side of you.
- Slowly move your arm forward and create a big circle movement.
- Rotate in each direction and then switch to the other arm.
Don’t slouch or round your back forward; instead, keep a strong posture throughout.
Another variation involves raising your arms out to the side and making smaller circles. Again, engage your core so you don’t sway in your movements.
Bow Pose [Advanced stretch]
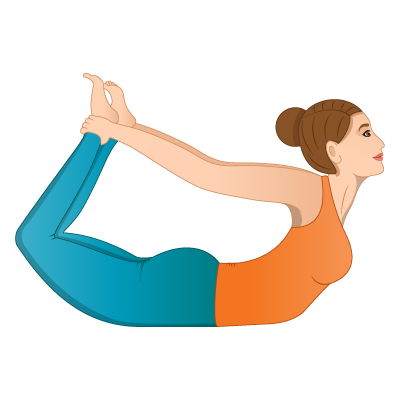
This pose is for the yogis amongst us. If you’ve built up your flexibility over time, the bow pose will help alleviate tension across your neck, shoulders, and latissimus dorsi.
This is a more advanced stretch and likely impossible to succeed with if you don’t have shoulder and back flexibility and mobility.
- Lay down on your stomach and bend your knees so your heels are near your bottom. Your knees should be at hip-width distance.
- You’ll be stretching upwards and then behind to grab your ankles.
- Once you feel ready, lift your ankles and heels towards the sky. Your thighs should be lifting off the floor.
- Press your shoulder blades together so your chest opens up. The top of your shoulders should be drawn away from your ears.
Thread the Needle [Intermediate stretch]
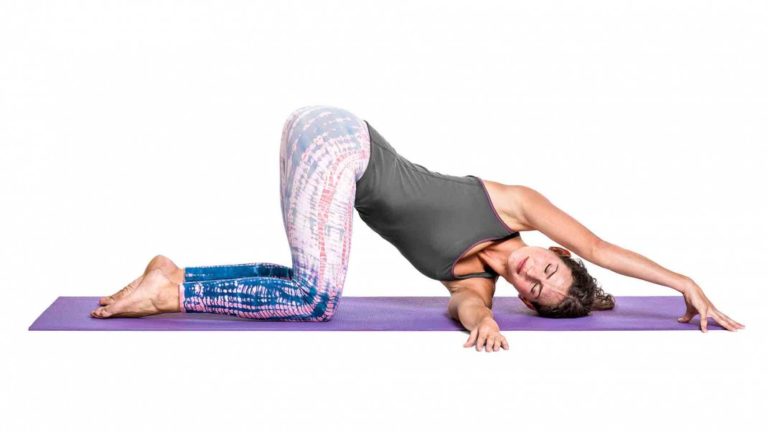
If you have gotten to a stage where the tightness in your shoulder isn’t as prominent and you can do the other stretches with ease, moving on to more challenging stretches could be beneficial.
This is a deep stretch, so take caution if you are still feeling any shoulder or back pain.
- Start on all fours and lift one hand off the floor.
- ‘Thread’ it through the space between your other arm and leg.
- The back of your hand that is being threaded through should be sliding along the floor.
- Your upper body and spine will naturally rotate. Keep your hips level and facing forward.
- When your hips begin to open to the new side, stop extending your arm.
If you’re feeling the stretch in your neck or hips, you could be doing it incorrectly. Maintain the correct position.
If this is too difficult to begin with, you could start by adapting to a ‘child’s pose.’
Safety And Technique
To help you on your way to fixing the tightness in your shoulders, there are some other key factors to remember throughout. From improving your posture to having a mindset shift, these are some elements that will help when going through any form of discomfort.
Realistic Expectations
Recovering from any kind of shoulder injury or tightness takes time. Setting goals can be disheartening as there’s no defined timeline for when your arm and shoulder will be fully fit; it all takes time and healing.
Tightness in the shoulder develops over time, so it’s important to recognize that improvement will also happen over time. Achieving shoulder mobility and the easing of pain requires patience, as you won’t see immediate effects.
Correct your posture
Before you do any of these stretches, your first port of call must be ensuring your posture is correct. Find a comfortable and upright postural position.
If you’re struggling with your posture, start by slouching your shoulders forward slightly. Then, overcorrect until you're in an upright position. You’ll feel a slight bend in your upper back, but this shouldn’t be putting any pressure on the neck or lower back.
Consistency
Being consistent in your approach to treatment is vital, as one-offs won’t make the impact you’re hoping for.
When it comes to stretching, setting some time aside each week or every couple of days would be more beneficial than once every month.
Mindset
Any kind of tightness in the muscles can be frustrating, especially when you want to hit the ground running and carry on with your daily life as you would before. Going into your recovery journey with the correct mindset can help you avoid frustration and disappointment.
Setting yourself up to adopt a holistic approach to healing is another great mindset shift to make. Just stretching alone might not make the progress that you’re hoping for.
Instead, consider other healing tools like red light therapy to complement your stretches and light exercises.
Final Thoughts
As soon as you feel the first twinges of pain, consult a medical professional and begin using these targeted stretches to address the specific areas of the shoulder.
For the more proactive amongst us, incorporating a stretching routine is an amazing way to keep tightness at bay while improving shoulder mobility and overall well-being.
The journey to improved joint and muscle health doesn’t have to end there either. Complement these exercises and expedite your recovery with the wonders of red light therapy.
Science has shown, time and time again, just how advantageous therapeutic wavelengths of red light are on our bodies. It’s a tool that can be used by busy professionals, active athletes, and people seeking relief from shoulder pain and tightness. The Move+ Pro is a wireless device that can be used on the go, requiring just 5-15 minutes of your time.
In a single 5-minute session, the Move+ Pro increases blood flow and reduces inflammation and pain - with our customers reporting an 80% reduction of pain in just 1-4 weeks.
We’re so sure you’ll feel the benefits, so much so that we offer a risk-free trial. You can try our medical-grade device for 30 days. If you’re not satisfied, we will offer a refund or further guidance.
Give the Move+ Pro a try today to significantly reduce your pain.
For more articles on shoulders, read: