
Repairing a Torn Rotator Cuff at Home: A Comprehensive Guide
From catching a baseball to reaching for that cereal box on the highest shelf in the grocery store, our shoulders do a lot more than what we give them credit for. It’s often only when an injury, such as a torn rotator cuff, strikes that we realize how much we take them for granted.
Damage to the rotator cuff or other parts of the shoulder can be debilitating and lead to a reduced quality of life or impaired functional capabilities. It doesn’t always have to be that way, though.
Aside from surgery, many other non-surgical treatments and self-care techniques can help with shoulder recovery. Let’s look at targeted exercises (with examples!) for shoulder cuff recovery, and other techniques to stop the pain in its tracks.
Understanding Rotator Cuff Tears
A torn rotator cuff is a common shoulder injury, particularly among athletes and individuals engaged in repetitive overhead activities. The rotator cuff comprises four muscles that originate on the scapula and insert into the head of the humerus. The main function of the rotator cuff is to stabilize the “ball and socket” of the shoulder joint.¹
Symptoms of a tear often include shoulder pain, weakness, and limited range of motion, which can significantly impact daily activities. The appropriate conservative care can promote healing and potentially avoid the need for surgical intervention.
What is the Rotator Cuff?
The rotator cuff consists of four muscles and their tendons that stabilize the shoulder joint and facilitate arm movements.¹
These muscles contribute to flexion, abduction, internal rotation, and external rotation. As a group, they stabilize the shoulder joint and perfect the movements of the humerus within the glenoid fossa.
When you’re experiencing difficulty lifting or rotating your arm, this could signal damage to the rotator cuff. Without the correct treatment and not allowing time for this area to heal, you could cause more damage and difficulties.
If damage has been caused, you may have a rotator cuff tear, tendinopathy, tendinitis, or bursitis.
The Anatomy Of The Rotator Cuff
The four muscles and their tendons that stabilize the shoulder joint
- Supraspinatus. This controls the lifting of the arm and the internal rotation.
- Infraspinatus. This enables the external rotation of your arm within the socket.
- Teres minor. As the name suggests, teres minor is a much smaller muscle that contributes to the ability to rotate.
- Subscapularis. When you hold your arm out straight and away from your body, the subscapular is working to maintain this abduction.
Types of Tears:
- Partial Tears: These involve damage to the tendon but do not completely sever it.
- Full-Thickness Tears: These are more severe, with the tendon being completely detached from the bone.
Common Causes:
- Overuse: Repetitive shoulder motions, especially overhead activities, can lead to wear and tear over time.
- Acute Injury: Sudden movements or falls can cause immediate tears.
- Degeneration: Age-related changes can weaken tendons, making them more susceptible to injury.
At-Home Pain Management Strategies
Rest and Activity Modification:
It is recommended to avoid activities that exacerbate and worsen pain into the shoulder and rest should be utilized in the case of acute injuries.
Ice and Heat Therapy:
- Ice Therapy: Applying ice packs to the shoulder for 20 minutes, several times a day, can help reduce inflammation and numb pain. However, recent research has show that applying cold may actually inhibit and delay healing.²
- Heat Therapy: Utilizing moist heat, such as a warm bath or heating pad, can relax tight muscles and improve blood flow, aiding in pain relief.³
For more on icing and heat therapy, read our article on icing versus red light therapy. For this article, we worked with Michael Kummer.
Over-the-Counter Medications:
Non-steroidal anti-inflammatory drugs (NSAIDs), such as ibuprofen, can help reduce pain and inflammation. It's essential to use these medications as directed and consult a healthcare provider if symptoms persist. While NSAIDs may reduce pain there is concern that they delay healing as well.⁴
Using Red Light Therapy at Home with the Kineon Move+
What is Red Light Therapy?
Red light therapy, also known as photobiomodulation, is a non-invasive treatment that uses specific wavelengths of light to penetrate tissues, promoting cellular activity, reducing inflammation, and accelerating healing.⁵
Why the Kineon Move+ is Effective:
The Kineon Move+ device utilizes targeted red and near-infrared light wavelengths, known for their deep tissue penetration and therapeutic benefits. Its design allows for easy application to shoulder areas, making it suitable for addressing rotator cuff injuries.

How to Use the Kineon Move+ for Rotator Cuff Tears:
- Treatment Protocol: Follow the manufacturer's guidelines regarding session duration and frequency. Typically, sessions may last around 20 minutes, several times a week.
- Application: Position the device over the affected shoulder area, ensuring direct contact with the skin for optimal light penetration.
- Consistency: Regular use is key to achieving therapeutic benefits. Monitor progress and adjust treatment frequency as needed.
Success Stories and Studies:
Clinical studies have demonstrated that red light therapy can effectively reduce shoulder pain and improve function.6 Additionally, users have reported positive outcomes when incorporating devices like the Kineon Move+ into their rehabilitation routines.
The Importance Of Targeted Exercises In Recovery
Whether you’re on the road to shoulder recovery after surgery or you’ve noticed some first signs of discomfort, targeted exercises can have a therapeutic effect on the rotator cuff muscles and tendons.
Engaging in specific exercises can strengthen shoulder muscles, enhance flexibility, and restore function. It's crucial to perform these exercises correctly to avoid further injury.
Another benefit is the strengthening of the muscles. When the shoulder joint has been weakened due to trauma or injury, targeted exercises can help rebuild the strength in this area. Regaining this is essential for restoring stability and function in the shoulder.
Exercises In for Shoulder Cuff Recovery
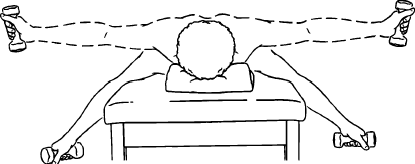
Pendulum Swings

Equipment: A table or something to support your body is needed.
How to perform the pendulum swing
- Place your hand, the one from your unaffected shoulder, on the table. Stand beside the table with your feet a little wider than shoulder-width apart.
- Bend your hips to 75 or 90 degrees and let your affected shoulder and arm hang down.
- Put your weight on either side, while letting your arm swing freely from side to side.
- Shift your body weight backward and forward, letting your arm swing in front of you and behind.
- Once you’re able, move your body so your arm swings in a circle. This circle should be less than 8 inches. Repeat this up to five times.
Benefits of pendulum swings: Promotes gentle mobilization of the shoulder joint.
Isometric Shoulder Exercises:

Equipment: No equipment is needed, but you need to be near a wall.
How to perform isometric shoulder exercises:
- Stand next to a wall with your elbow bent to 90 degrees and positioned against the body.
- Press the back of your hand against the wall without moving your shoulder.
- Hold for 3-5 seconds and release.
- Repeat for 10-20 repetitions.
- Repeat this exercise the other way into internal rotation, this time standing in a doorway with the palm against the door frame.
Benefits: Activates rotator cuff muscles without excessive strain.
Side Lying Shoulder External Rotations:

Equipment: A towel is needed for this exercise.
How to perform side-lying shoulder external rotations:
- Lie on your side with a towel under your shoulder in your armpit.
- Have your elbow bent at 90 degrees flexion.
- Rotate your shoulder so that your hand moves towards the ceiling.
- Pause at the top and return slowly to the start position.
- Repeat for 10-20 repetitions.
- Benefits: Strengthens external rotator muscles of the shoulder.
Tips for progression:
- Start Slow: Begin with gentle exercises and gradually increase intensity as tolerated.
- Listen to Your Body: Avoid movements that cause pain. Mild discomfort is normal, but sharp pain should be a warning sign.
- Consistency: Regular exercise is vital for recovery. Aim for daily sessions, adjusting based on comfort and progress.
Supraspinatus Exercises
This muscle in the rotator cuff is the most commonly injured and torn because it covers the whole top of the humerus and faces the most force when lifting the arm. The following exercises focus on the supraspinatus:
4-Point
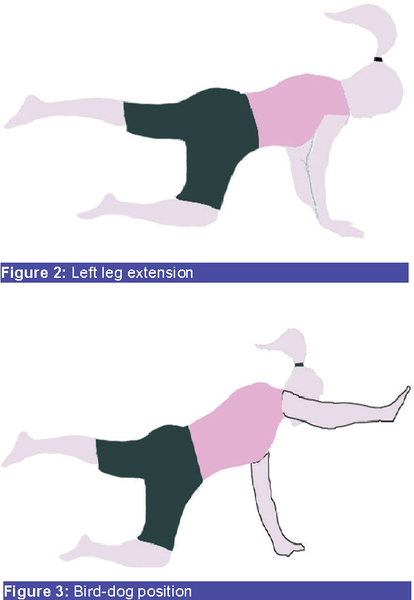
Equipment: No equipment is needed.
How to perform the 4-point
- Starting on your hands and knees, in 4-point kneeling, maintain a good neutral posture and equal weight stabilization.
- Lean forward, backward, and side to side. This will switch the weight balance until you return to the middle and regain this neutral position. If comfortable, you can lift one arm at a time.
- Repeat these repetitions several times and for a repeat of 3 sets.
Benefits: strengthens the supraspinatus and stabilizes the shoulder by engaging core and scapular muscles, promoting controlled movement and aiding recovery from a torn rotator cuff.
Passive Internal Rotation

Equipment: No equipment is needed, but you may prefer having a friend help you. This exercise can either be done sitting or standing.
How to perform the passive internal rotation
- Bend one arm and position this to the side of you, lateral to your body, and your wrist should face the front.
- Then, a helpful friend should gently push your wrist down/back until tightness is felt. Or you can do this step by yourself if you feel able. Repeat as many times as needed. The wrist should be able to travel below the transverse plane of the shoulder.
Benefits: helps maintain joint mobility, reduce stiffness, and gently stretch the shoulder muscles.
Subscapularis Exercises
The subscapularis is located right at the front of the shoulder blade, with the main aim of this area being to allow you to rotate the arm internally. It stabilizes the shoulder during arm extensions, too.
Prone Horizontal Abduction
Equipment: You need to be laid horizontally, with room for your arms to dangle to the sides beneath you. An exercise bench would be useful for this.
How to perform the prone horizontal abduction
- Lay down, face first, on a bench. Allow your arms to rest below you and to the side
- 2. Keep your elbow straight and rotate your shoulder so your palm faces forward and your thumb away from you.
- Raise your arm to the side until your shoulder makes a 90-degree angle with your body.
- Your thumb should face the sky when the arm is raised. Repeat this for two to three sets. As you become more confident and your shoulders stronger, you can increase from body weight to light dumbbells.
Benefits: Improves shoulder control, posture, and overall joint function which is especially important in rotator cuff rehab.
Infraspinatus and Teres Minor Exercises
The infraspinatus sits on the dorsal surface of the scapula and parts of the deltoid and latissimus dorsi muscles. The teres minor is on the posterior surface of the scapula, opposite its lateral border.
Banded Internal Rotation
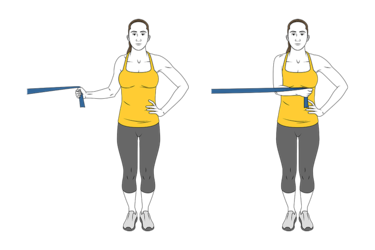
Equipment: You’ll need a resistance band. These come in varying strengths; choose one you feel most comfortable with. This will be wrapped around a standing object.
How to perform the banded internal rotation
- Wrap the band around the sturdy object and assume a standing position.
- Flex your elbow to 90 degrees and hold the band in one hand.
- Bring your hand towards your body while ensuring your elbow remains right to your torso.
- Then, slowly bring the band in and back to the starting position. This should all be done under control. Repeat for two to three sets.
Benefits: strengthens the teres minor by targeting shoulder external rotators and scapular stabilizers, improving posture, joint stability, and functional shoulder movement
Band Reverse Fly
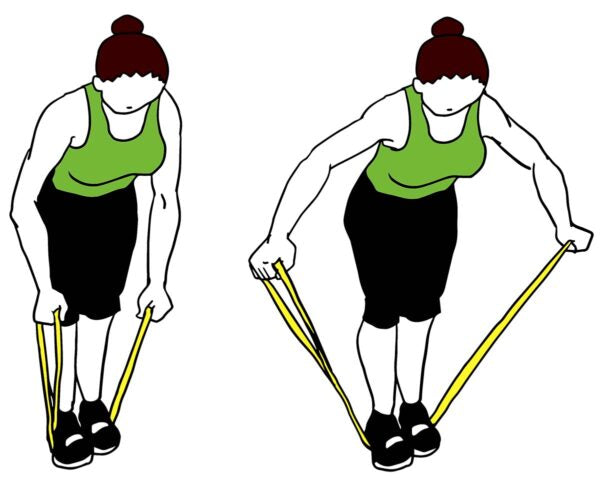
Equipment: You’ll need a resistance band. These come in varying strengths; choose one you feel most comfortable with.
How to perform the band reverse fly
- Stand on a resistance band with both feet. You’ll then be able to hold the handles or the remaining sections of the band.
- Bend your knees slightly and lower your back so it’s parallel to the floor.
- Now, raise your arms to the side, with your elbows bent towards the front.
- Lower the band back to the starting position and repeat for two to three sets.
Benefits: strengthens the teres minor and upper back muscles, enhancing shoulder external rotation, scapular stability, and postural support
Side-Lying External Rotation

Equipment: No equipment is needed except something to prop your arm up.
How to perform the side-lying external rotation
- Lay down on your side.
- Keep your knees together, but bend your legs behind you slightly.
- Place a cushion or towel under your armpit so your shoulder remains still.
- Bend your top arm to a 90-degree angle.
- From this point, rotate your arm until your hand faces the ceiling. You should start to feel a small stretch in your shoulder muscles. Hold this for three seconds before repeating for two to three sets on both arms.
Benefits: isolates and strengthens the teres minor
When to Seek Professional Help
- Persistent Pain: If pain continues despite at-home interventions.
- Significant Weakness: Inability to lift the arm or perform daily activities.
- Limited Range of Motion: Difficulty moving the shoulder through its normal range.
Combining At-Home Care with Professional Treatment:
While at-home strategies are beneficial, consulting with a healthcare provider or physical therapist can offer personalized guidance. It is important to seek out a physical therapist that specializes in treating rotator cuff tears, such as those at Fuel Health & Wellness. They can assess the severity of the tear and appropriate interventions.
How To Have A Safe And Effective Recovery
Having a safe shoulder recovery journey is of utmost importance. The road to healing after surgery can be a daunting one. If operating on your shoulder cuff isn’t an option, you can often achieve great function without this. To do so, there are some simple steps to get the best out of this time.
Consult with your healthcare provider
As with all independent circumstances, your doctor can provide the necessary information on what is right for you and your recovery.
This could mean a recommendation to rest until the pain lessens, or a series of healing techniques could be suggested depending on the severity of the damage. This could include exercising, red light therapy, medication, hot or cold treatments, or even acupuncture.
You should create a personal plan tailored to your needs.
Introduce a healing plan
Consider the use of red light therapy. This non-invasive treatment uses specific wavelengths to stimulate cellular activity and promote function, repair, and regeneration.
It can be used in a targeted way so you can focus on your shoulder specifically. It’s a great way to help treat shoulder pain as it accelerates tissue repair, allowing people to recover more swiftly. It’s non-intensive too, so if you’re in too much pain to exercise at this stage, the consistent use of red light therapy can be extremely beneficial.
Slowly introduce exercise back into your routine
The aim is to start exercising when you feel ready to, as this can strengthen muscles, increase flexibility, reduce stiffness, and enable a better range of motion. All of these aspects will help your muscles heal and feel as good as before.
Start with lower-intensity exercises like the 4-point exercise, which focuses on shifting weight to each side of your body. The pendulum is another easy activity to bring on a small stretch while helping you gauge how much you can move your shoulder at this stage.
Stay patient
It can be difficult to see the light at the end of the tunnel when you’re facing weeks or months of pain while your shoulder is repairing itself. Seeking support from red light therapy while introducing exercising back into your routine can help significantly.
How Can Kineon Help With Shoulder Rehabilitation?
At Kineon, we have created a medical-grade light therapy device - called Move+ Pro - that can help temporarily reduce shoulder pain in as little as 5 minutes. And the best part? You can treat your pain at home.
Combining both LED lights and laser technology, you can specifically pinpoint your problem areas for fast and effective relief. This means you can place the device on your shoulder joint, upper or lower arm, and the wavelength from the red light will penetrate your skin to deliver energy to the cells.
Once delivered, this will stimulate healing, relieve pain, and activate all the good stuff that red light therapy is known for.
The Move+ Pro is a small device that is completely wireless, so you don’t have to be tethered in to use it. It’s also FDA-registered, giving you peace of mind that you’re getting a reliable and effective device to help you on your journey to rehabilitation.
The Effectiveness Of Light Therapy
Light therapy has been used in one form or another for centuries, and we’re really talking centuries. Ancient civilization once harnessed the power of sunlight through worshipping practices and now, in 2023, it’s being used worldwide across hospitals, sports rehabilitation centers, and even in spas.
The potential of light therapy is huge, as it can stimulate cellular activity, reduce inflammation, promote healing and rejuvenation, speed up tissue repair, and alleviate muscle soreness.
Managing a torn rotator cuff at home
Managing a torn rotator cuff at home involves a combination of rest, targeted therapies like red light therapy, structured exercises, and vigilant monitoring of symptoms. Utilizing devices such as the Kineon Move+ can enhance the healing process by reducing inflammation and promoting tissue repair. However, it's essential to recognize when professional medical evaluation is necessary to ensure optimal recovery. By adopting these comprehensive strategies, individuals can effectively navigate the healing journey and restore shoulder function.
References
- May T, Garmel GM. Rotator Cuff Injury. [Updated 2023 Jun 26]. In: StatPearls [Internet]. Treasure Island (FL): StatPearls Publishing; 2025 Jan-. Available from: https://www.ncbi.nlm.nih.gov/books/NBK547664/
- Wang ZR, Ni GX. Is it time to put traditional cold therapy in rehabilitation of soft-tissue injuries out to pasture? World J Clin Cases. 2021 Jun 16;9(17):4116-4122. doi: 10.12998/wjcc.v9.i17.4116. PMID: 34141774; PMCID: PMC8173427.
- Hotfiel T, Fanlo-Mazas P, Malo-Urries M, Paulino E, Sequeira de Medeiros L, Blondett M, Vetrano M, Freiwald J. Importance of heat therapy in the treatment of pain in the daily clinical practice. J Bodyw Mov Ther. 2024;38:263-268. doi:10.1016/j.jbmt.2024.01.015.
- Duchman KR, Lemmex DB, Patel SH, Ledbetter L, Garrigues GE, Riboh JC. The Effect of Non-Steroidal Anti-Inflammatory Drugs on Tendon-to-Bone Healing: A Systematic Review with Subgroup Meta-Analysis. Iowa Orthop J. 2019;39(1):107-119. PMID: 31413684; PMCID: PMC6604538.
- https://fuelhealthwellness.com/the-science-behind-red-light-therapy-how-it-helps-heal-your-body/
- Abufoul R, Gavish L, Haddad M. Photobiomodulation self-treatment at home after rotator cuff arthroscopic repair accelerates improvement in pain, functionality, and quality of life: a double-blind, sham-controlled, randomized clinical trial. Lasers Surg Med. 2023; 55: 662–673. https://doi.org/10.1002/lsm.23692